Zemowp

Zemowp

Did You Know?

Getting Started

Before building your site, better take a look at this section.

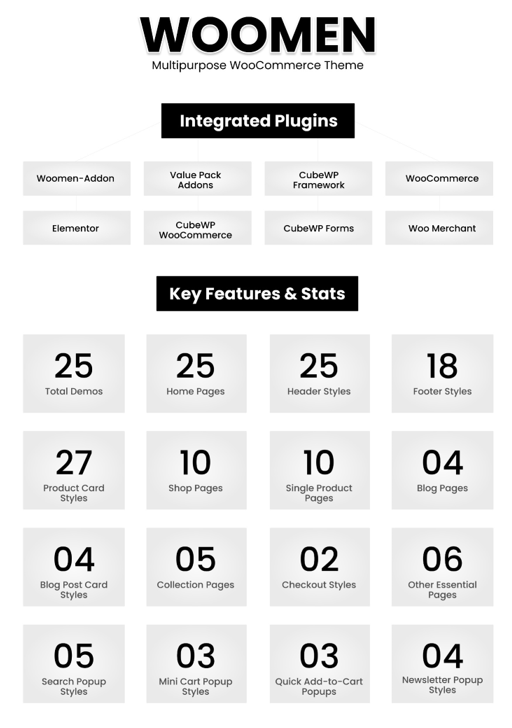
Woomen Theme Overview

Woomen Theme Essentials: System Requirements & WordPress Configuration

You need to have a WordPress installation on your website to use our theme.

NOTE: if you want to install dummy content from our demo site, we highly recommend installing it on a fresh WordPress website without any data.

WordPress installation

General steps to install WordPress CMS to your site

  1. Download the latest WordPress version from https://wordpress.org/download/
  2. Upload the zip file to your website root folder and unzip
  3. Create a database (using your hosting panel)
  4. Set up WordPress. Detailed instructions

Sometimes you may get some errors while installing our theme, importing content, or activating plugins like white screen or PHP errors. They may be caused by low PHP configurations limits. In this case, you need to increase some values. You can do this on your own or contact your hosting provider with the following requirements:

  1. memory_limit 512M
  2. post_max_size 128M
  3. upload_max_filesize 64M
  4. max_execution_time 300
  5. max_input_vars 10000

Theme Installation and Setup

You can control the theme’s functionality and customize theme’s content from. Here you will find all relevant settings to customize the theme.

How to Install the Woomen Theme

How to Install and Activate Your WordPress Theme


Follow these steps to upload, install, and activate your theme using the WordPress admin dashboard.

1.      Log in to your WordPress Dashboard.

2.      Navigate to Appearance > Themes.

3.      Click on the Add New button, then select Upload Theme.

4.      Choose the theme .zip file from
your computer.

5.      Click Install Now to begin the installation.


6.      Once the installation is complete, click Activate to enable the
theme on your site.


How to Install a WordPress Theme via FTP

Installing a WordPress theme via FTP or cPanel File Manager is a useful method when facing file upload limitations or dashboard-related issues.


Installing via FTP (e.g: FileZilla)

Prerequisites:

  • FTP client (such as FileZilla)

  • FTP credentials (host, username, password, port)

  • Theme .zip file downloaded to your computer

Steps:


  1. Extract the Theme File

    • Unzip the downloaded .zip theme file on your computer.

    • You will get a folder (e.g., Woomen) containing the theme files.

  2. Connect to Your Website via FTP

    • Launch FileZilla (or any FTP client).

    • Enter your FTP details and connect to the server.

  3. Navigate to the Themes Directory

    • Open the folder path:
      public_html/wp-content/themes/

  4. Upload the Theme

    • Upload the extracted theme folder into the themes directory

  5. Activate the Theme

    • Log in to your WordPress dashboard.

    • Go to Appearance > Themes

    • Locate your theme and click Activate.


Activating Required Plugins for Woomen

Included Tools and Plugins

Woomen comes integrated with several essential plugins and tools to enhance the theme’s capabilities. Below is a breakdown of the plugins used and how to install them.


Required & Recommended Plugins for Woomen

Here are the main plugins used with the Woomen theme:

1. Elementor

Elementor is a powerful drag-and-drop page builder that allows users to design complex layouts visually. It eliminates the need for coding and supports a wide range of widgets, design features, and integrations through additional add-ons.

2. CubeWP Framework

CubeWP Framework is a dynamic content framework for WordPress designed to streamline the development process by up to 90%. It supports advanced dynamic content structures and is ideal for developers and content-heavy websites.
Learn more

3. CubeWP Forms

CubeWP Forms is a extension for the CubeWP Framework that lets you easily build simple to very advanced forms including contact forms, lead forms, feedback forms, appointment request forms, and newsletter subscription forms (MailChimp integration) for your website using a drag-and-drop form builder and manage all the leads from WordPress backend.

4. CubeWP Addon Woocommerce

CubeWP WooCommerce Addon is a CubeWP extension that enables you to create post type submission forms, such as “Submit a Product” or “Submit a Post.”

5. Woomen-Addon

The Woomen Addon is the core companion plugin developed specifically for the Woomen theme. It is required for the theme to function fully and unlocks essential features that enhance the flexibility and customization options of your website.

One of the primary features of the Woomen Addon is its ability to allow users to create and customize Post Card Styles. These styles are pre-designed layouts used to display content (such as blog posts, products, or custom post types) in a visually appealing “card” format.

6. Woocommerce

WooCommerce empowers you to build, sell, and grow on your terms. Our WordPress-powered platform offers fully customizable ecommerce, for less

7. Woo Merchant

Woo Merchant is a modular and feature-rich WooCommerce enhancement plugin designed to optimize the performance, functionality, and user experience of your online store. It offers a collection of over 15+ free modules that you can enable or disable based on your store’s specific needs.

The main goal of the Woo Merchant plugin is to help store owners:

  • Increase conversion rates

  • Improve user engagement

  • Enhance the overall shopping experience

  • Reduce cart abandonment

  • Add advanced eCommerce functionalities without relying on multiple separate plugins

8. Nextwp-Sites

NextWP Sites is a powerful demo importer plugin integrated with the Woomen Theme to help users quickly and easily set up their website by importing ready-made demo content.

The primary purpose of NextWP Sites is to allow users to import pre-built demo websites with just a few clicks. These demo sites are professionally designed and come with all the necessary pages, templates, images, and settings. This helps you get started faster by providing a fully designed website that you can customize to suit your needs.

9. Value Pack Addons

This plugin extends Elementor’s core functionality by adding extra widgets, design elements, and layout options. It provides greater flexibility when designing custom sections and enhances the overall design process.


Plugin Installation Guide

After completing the theme installation, you will see a prompt notification indicating that required plugins need to be installed. Simply follow the prompt and select the option to install the plugins. All the necessary plugins are pre-packaged with the theme, so they will be installed automatically in one click.

How to Properly Import Demo Content in the Woomen Theme

Importing Demo Content Using NextWP

NextWP is a WordPress plugin designed to help you set up your website quickly and efficiently. One of its key features is the Demo Import functionality, which allows you to import fully designed demo content with just a few clicks. This gives you an instant preview of the site’s layout, structure, and design, making it easier to understand how the theme works and how to customize it to your needs.

Note: After activating the theme, you will be automatically redirected to the demo importer
screen. Click
“Get Started” to begin the process.

How to run Setup Wizard to import the demo:

Alternatively, you can access the importer manually by following these steps:

1.      Go to your WordPress Dashboard > Woomen.

2.      In the importer interface, follow these steps:

o    Step 1: Install all required plugins when prompted.

o    Step 2: Select the demo you wish to import from the available options.

o    Step 3: Click to proceed with the demo import. This process may take several minutes depending on your server speed—please be patient.

Once the import is complete, your site will be populated with the selected demo content.

Overview Of Theme Builder

What is the CubeWP Theme Builder?

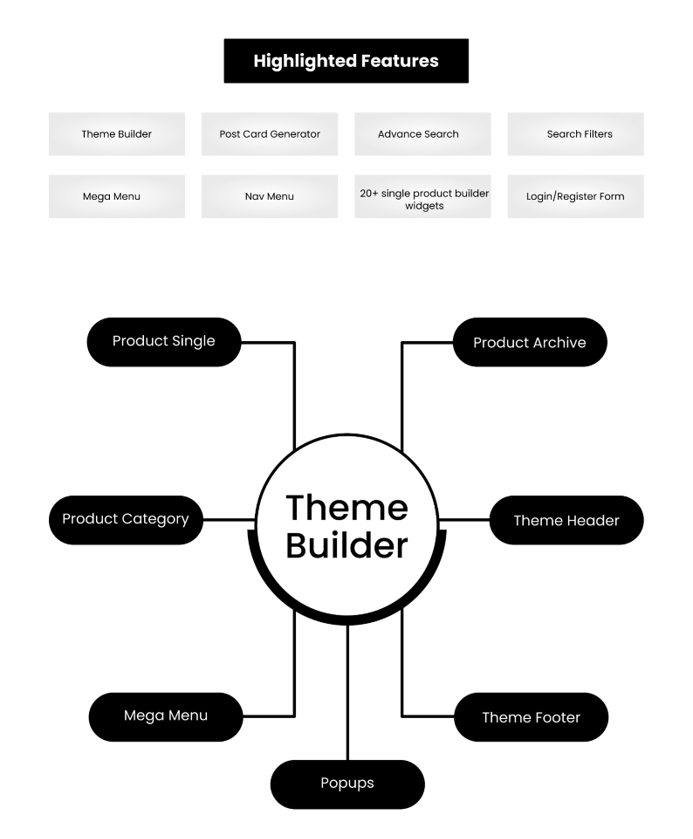
The CubeWP Theme Builder is a dynamic design tool that allows you to create and manage custom templates for various sections of your website—without needing to write code. It’s deeply integrated with CubeWP’s core functionality, making it ideal for building advanced, data-driven websites.


You may locate it from WordPress dashboard> CubeWp> Theme Builder.


What Can You Build with CubeWP Theme Builder?

Using the CubeWP Theme Builder, you can create templates for:

  • Header – Design unique header layouts for different pages .

  • Footer – Customize your site’s footer with flexible layout options.

  • Single – Build detailed single post page layouts.

  • Archive – Customize how your category, tag, or listing archives look.

  • Hooks – Add content into predefined locations throughout your theme (before/after content, inside loops, etc.).

  • Shop – If integrated with WooCommerce, you can design product, cart, or shop templates.

  • Mega Menu – Build advanced navigation menus with columns, images, or post grids.

  • 404 Page – Design a fully custom “Page Not Found” experience.


The CubeWP Theme Builder gives you complete design freedom and works seamlessly with dynamic content fields, making it ideal for directory sites, listing platforms, and other advanced use cases.

What is a Theme Builder and How It Helps in the Woomen Theme

What is the CubeWP Theme Builder?

The CubeWP Theme Builder is a dynamic design tool that allows you to create and manage custom templates for various sections of your website—without needing to write code. It’s deeply integrated with CubeWP’s core functionality, making it ideal for building advanced, data-driven websites.


You may locate it from WordPress dashboard> CubeWp> Theme Builder.


What Can You Build with CubeWP Theme Builder?

Using the CubeWP Theme Builder, you can create templates for:

  • Header – Design unique header layouts for different pages .

  • Footer – Customize your site’s footer with flexible layout options.

  • Single – Build detailed single post page layouts.

  • Archive – Customize how your category, tag, or listing archives look.

  • Hooks – Add content into predefined locations throughout your theme (before/after content, inside loops, etc.).

  • Shop – If integrated with WooCommerce, you can design product, cart, or shop templates.

  • Mega Menu – Build advanced navigation menus with columns, images, or post grids.

  • 404 Page – Design a fully custom “Page Not Found” experience.


The CubeWP Theme Builder gives you complete design freedom and works seamlessly with dynamic content fields, making it ideal for directory sites, listing platforms, and other advanced use cases.

Page Customization

Complete Overview of the Woomen Theme Homepage Design

Home Page Structure & Key Elements

The Home Page is built using Elementor, combining:

  • Default Elementor widgets

  • CubeWP elements

  • Value Pack Addons

Below is the breakdown of essential components on the homepage:

1. Banner Slider
2. Instagram Feeds
3. Product Variations

How to Design and Add a Banner Using elementor in Woomen Theme

 How to Create a Banner Slider:

A Banner Slider is an engaging and interactive element used to display a series of promotional images, product highlights, or key announcements in a rotating slideshow format on your website’s homepage. This feature is implemented using the Value Pack Addons plugin—an essential tool that enhances the functionality of your WordPress site without requiring any advanced coding skills.

The Value Pack Addons plugin offers a collection of powerful widgets and elements, among which the Banner Slider is one of the most widely used. It enables you to effectively promote featured products, seasonal campaigns, or special offers, making your homepage more dynamic and visually appealing.


Key Features of the Banner Slider:

  • Display multiple slides with images or banners in a smooth sliding or rotating sequence.
  • Customize slide content by adding text overlays, clickable links, and product visuals.
  • Configure settings such as slide duration, transition effects, and navigation controls for better user interaction.
  • Drive user engagement by highlighting important sections of your site, increasing visibility and click-through rates.

Benefits:

Incorporating a Banner Slider on your homepage helps you:

  • Capture visitor attention immediately upon arrival.
  • Promote time-sensitive deals or new product launches.
  • Enhance the overall aesthetic and usability of your website.

This feature is a valuable addition for any site looking to improve user experience while showcasing important content in a professional and attractive manner.

.

Here is the video to learn how to make the slider:


Please watch the video below to learn the complete procedure.

How to Add and Manage Product Variations in the Woomen Theme

WooCommerce Product Types: Simple Product vs Variable Product

WooCommerce offers different product types to suit a wide range of selling
needs. Two of the most commonly used types are Simple Products
and Variable Products.

What is a Simple Product?

A Simple Product is a standalone item with no variations. It comes with a single price, SKU, and inventory.

Examples:

·         A book

·         A USB cable

·         A digital download file

 How to Create a Simple Product:

1.      Go to your WordPress Dashboard > Products > Add New

2.      Enter the Product Title and Description

3.      Scroll to the Product Data section and choose Simple Product

4.      Add:

o    Price

o    SKU (optional)

o    Inventory and stock status

o    Product Image and Gallery

5.      Click Publish


What is a Variable (Variational) Product?

A Variable Product allows you to sell a single product with multiple options or variations, such as different sizes, colors, or materials. Each variation can have its own SKU, price, and stock status.

Examples:

·         A t-shirt in multiple sizes and colors

·         A phone case in different materials

·         Shoes in different sizes


How to Create a Variable Product:

1.      Go to Products > Add New

2.      Enter the Product Title and Description

3.      In the Product Data dropdown, select Variable Product


Step-by-Step to Add Variations:

Step 1: Create Attributes

1.      Go to the Attributes tab inside the Product Data box

2.      Click Add (e.g., Size, Color)

3.      Add attribute values separated by | (e.g., Small | Medium | Large)

4.      Check “Used for Variations” and click Save Attributes


Step 2: Create Variations

1.      Navigate to the Variations tab

2.      Click “Add Variation” or select “Create variations from all attributes”

3.      Set:

o    Price

o    SKU

o    Stock status

o    Image for each variation

4.      Save Changes

5.      Finally, click Publish


How to Display Variable Products in the Woomen Theme

How to Show Products with Variations (e.g. Size, Color) on Your Website

Elementor makes it easy to showcase variable products on your pages using the Product Variations widget. This feature allows you to visually highlight specific WooCommerce variable products with customizable styles and layouts.


 Step 1: Add the Variable Product Widget

1.      Open your page in Elementor Editor.

2.      In the left sidebar, search for the widget named “Product Variations”.

3.      Drag and drop the Product Variations widget onto your page.

4.      In the widget settings, you’ll see an option to Add Product IDs.

This is where you enter the ID(s) of the variable product(s) you want to display.


Step 2: How to Find a Product ID

You can find a product’s ID in two ways:


Method 1: From the Product Edit Page

1.      Go to your WordPress Dashboard > Products.

2.      Click Edit under the product you wish to use.

3.      In the browser’s address bar, look for the post parameter in the URL:

In this example, 14331 is the Product ID.


 Method 2: From the Product List

1.      Go to WordPress Dashboard > Products.

2.      Hover your mouse over the desired product.

3.      Below the product title, you’ll see the Product ID displayed as:


 Final Notes:

·         Make sure the product you enter is a Variable Product.
·         Only enter the numeric Product ID, separated by commas if showing multiple.

How to Display Instagram Feed on Your WooCommerce Store

How to Connect and Display Instagram Posts on Your Site

This guide explains how to display Instagram posts (feeds) on your website using an access token and Elementor. By following these steps, you’ll be able to showcase either your full Instagram feed or posts by a specific hashtag.

Step 1: Generate Your Instagram Access Token

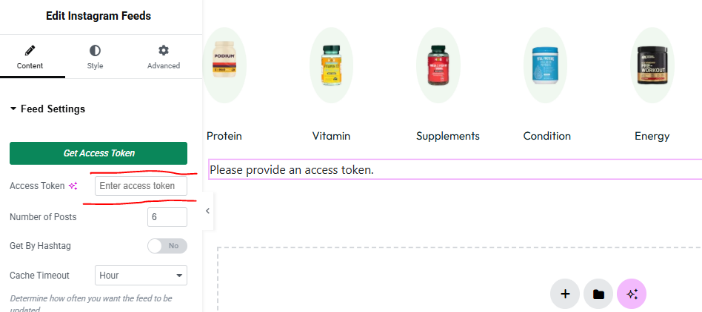
To connect your Instagram account with your website, you’ll first need to
create an Access Token. This token authorizes your site to
fetch your Instagram content.

Follow one of the tutorials below to generate your token:

       
1- Official Facebook Developer Guide

     
2- Bricks Builder Instagram Access Token Guide

Once the token is generated, keep it safe — you’ll need it in the next step.


Step 1: Configure Instagram Feed Settings

Please go to your WordPress dashboard> CubeWp> Settings> Insta Feeds>Enter the Instagram access token here.


Step 2: Embed Instagram Feed on Your Website

Now that you have your access token, it’s time to embed the feed on your desired page.

1.      Open your WordPress Dashboard

2.      Navigate to Pages and select the page you want to edit (e.g., Home Page)

3.      Click Edit with Elementor

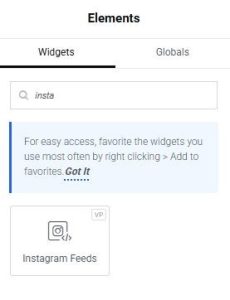
4.      From the Elementor sidebar, drag the “Instagram Feed” widget onto your page

Kindly watch the video below for the complete procedure​

How to add and showcase brands on any page using the Woomen theme.

In WooCommerce, Brands are a default taxonomy that allows you to categorize products by their brand name. With the Woomen theme and Elementor, you can not only create and assign brands but also display them beautifully in a slider format on any page of your store.

This guide will walk you through:

  • Adding a new brand

  • Associating products with a brand

  • Displaying brand logos in a slider with Elementor


Step 1: Adding a New Brand

  1. In your WordPress Dashboard, go to Products > Brands.

  2. You will see existing brands listed here.

  3. To add a new brand:

    • Enter the brand name (e.g., Louis Vuitton).

    • Set a slug (e.g., LV).

    • Click Add New Brand.

  4. Your brand will be added successfully, but initially, it will not show any products.


Step 2: Associating Products with a Brand

You can either create a new product under a brand or assign an existing product to a brand.

Option A: Adding a New Product

  1. Go to Products > Add New.

  2. Enter product details such as name (e.g., Jeans), description, attributes, and shipping details.

  3. Upload a product image and gallery images.

  4. Select the appropriate category (e.g., Denim Jeans).

  5. In the Brands taxonomy section, select the newly created brand (e.g., Louis Vuitton).

  6. Publish the product.

Now, if you refresh the brand page, your new product will appear under that brand.


Option B: Assigning an Existing Product

  1. Go to Products > All Products.

  2. Edit any product you want to assign to a brand.

  3. Scroll to the Brands taxonomy section.

  4. Select the brand (e.g., LV).

  5. Update the product.

The product will now appear on the brand’s page.


Step 3: Adding a Brand Slider in Elementor

If you want to showcase your brands as a slider on a page, follow these steps:

  1. Open the page with Elementor.

  2. Add a container where you want to display the slider.

  3. To create spacing, use the Spacer widget above or below the container.

  4. Set the container to Full Width.

  5. Inside it, add another container (also full width).

  6. Drag and drop the Image widget for each brand logo.

    • Upload your brand logo image.

    • Duplicate the widget to add multiple brand logos.

  7. Select the main logo container, go to layout settings, and set Display: Flex to align logos in a single row.


Step 4: Enabling Slider Functionality

  1. Go to the Advanced Settings of the container that holds the images.

  2. Enable the Slider option.

  3. Choose how many logos to display per slide (e.g., 3).

  4. Save your changes and refresh the page.

Your logos will now appear in a working slider.


Step 5: Linking Logos to Brand Pages

  1. In Elementor, select a logo image.

  2. In the sidebar settings, go to Link > Custom URL.

  3. Copy the brand page URL from your WordPress dashboard (Products > Brands > View) and paste it into the link field.

  4. Repeat this for each logo.

  5. Save changes and refresh the page.


Now, when visitors click on a brand logo, they will be redirected to the brand’s page showing all products under that brand.

Watch the video below to see the complete process

Product Comparison Feature in WooCommerce (Woomen Theme)

Introduction

The Product Comparison feature in WooCommerce allows customers to compare two or more products side by side. This helps users analyze features, prices, reviews, and other important details, making decision-making easier and faster.

In the Woomen Theme, this feature can be added to multiple sections of your store, such as:

  • Homepage

  • Shop Page

  • Product Detail Page


Benefits of Product Comparison

  • Saves time by allowing quick evaluations

  • Enhances user experience by simplifying choices

  • Boosts conversions by helping customers make confident purchase decisions


Adding the Product Comparison Feature

Step 1: Edit Product Page with Elementor

  1. Go to your WordPress Dashboard.

  2. Navigate to Pages > Product Detail Page.

  3. Click Edit with Elementor.

  4. Once the page loads, scroll to the section where you want to add the feature.


Step 2: Insert Comparison Widget

  1. Add a new Container and set it to Full Width (or Boxed view if preferred).

  2. Search for Product Comparison in Elementor widgets.

  3. Drag and drop the Product Comparison widget into your container.


Step 3: Select Products for Comparison

  1. By default, the widget will load the product currently being viewed.

  2. To add another product:

    • Go to WordPress Dashboard > Products.

    • Hover over a product to see its Product ID.

    • Copy the ID and paste it into the widget settings.

Example: Add ID 1180 to compare two products.


Step 4: Customize the Feature

  • Image Comparison Option – Switch to “Image Comparison” if you want to compare images instead of products.

  • Titles & Labels – Edit product or image titles for clarity.

  • Styling Options:

    • Change text colors & typography

    • Adjust container height

    • Switch between Full Width or Boxed View

    • Replace or customize comparison icons (e.g., use arrows)

Watch the video below to see the complete process

How to Customize the Archive/Shop Page in the Woomen Theme

CubeWP Default Archive Page Overview

The default archive page in CubeWP is built to showcase a list of products or posts, equipped with essential browsing and filtering tools. By default, it features product images, search filters, sorting options, and a product grid. All these components can be easily managed from the WordPress admin panel.


Here’s the list of elements added on the shop page:

  • Static Images and Links

  • Filters Panel

  • Sorting Filter

  • Archive posts display

  • Additional Settings

  • Posts Per Page

Kindly watch the video below for the complete procedure

How to Configure the Shop Page

In WooCommerce, the Shop Page serves as your online storefront. It showcases all your products in a catalog-style layout, allowing visitors to browse, filter, and sort items easily.

By default, WooCommerce automatically creates a Shop page during installation.

With the Woomen Theme, the Shop Page is further enhanced with advanced layout options, filters, banners, and customization features for a more engaging shopping experience.

How to Configure the Shop Page

  1. Go to your WordPress Dashboard.

  2. Navigate to CubeWP > Theme Builder.

  3. Click Add New Template.

  4. Select Shop Page and save it.

  5. You will be redirected to Elementor, where you can start customizing the layout and design.


Please read the articles below to learn more about the elements of the Shop Page. You can also watch the Archive Page video for further guidance.

How to Set Up the Filters Panel

Filters Panel

Filters help users narrow down the search results based on specific attributes, making it easier to find relevant products on the archive or shop page. In CubeWP, you can create and display filters such as:

  • Color – Filter products by available color options.

  • Price – Allow users to select a price range.

  • Size – Show only items available in specific sizes.

  • Categories – Let users browse by product categories.


How to Set Up Filters

  1. Create Filters:

    • Go to your WordPress Dashboard → CubeWP → Search Filters.

    • Click Add New and select the post type (e.g., Product, Listing) for which you want to create filters.

    • Add your desired filters (Color, Price, Size, Categories, etc.).

  2. Display Filters on Archive/Shop Page:

    • Edit the archive or shop page using Elementor.

    • Drag and drop the CubeWP widget called “Search & Filters Form” onto the page.

    • In the widget settings, choose select form type as “Filters form” and select “Post type for which you want to show”

These dynamic filters will now appear on your archive page, allowing users to refine search results based on the options you’ve configured.

How to Configure Additional Settings

How to Change the Number of Posts Per Page

The Posts Per Page setting controls how many products or posts are displayed on each page of the archive or shop layout. This is essential for managing content load, improving user experience, and organizing your listings efficiently across multiple pages.

When you define a specific number of posts per page:

  • Only that number of items will be shown on a single archive page.

  • The rest will be accessible through pagination controls (e.g., next/previous page links or numbered pagination).

  • It helps reduce page load time by limiting the number of items shown at once.


How to Set It Up

 
Please go to your WordPress dashboard> CubeWP> Settings> Archive settings> Posts per page

How to Add a Sorting Option

Sorting Filter

The Sorting Filter allows users to rearrange the product or post listings on the archive page based on specific criteria. This improves the browsing experience by letting users control how content is displayed according to their preferences.


Available Sorting Options:

  • Newest: Displays the most recently published products or posts first.

  • Oldest: Shows the oldest products or posts first, based on publish date.

  • Title: Sorts items alphabetically by title (A–Z or Z–A, depending on configuration).

  • Random: Displays items in a random order with each page load—ideal for showcasing different content on each visit.

  • Best Match: Prioritizes results that best match the user’s search query (usually enabled when search terms are involved).

  • Price: Low to High: Sorts products by price in ascending order, showing the most affordable items first.

  • Price: High to Low: Sorts products by price in descending order, displaying premium or expensive items first.


How to Set It Up:

  1. Edit the archive or shop page using Elementor.

  2. Drag and drop the CubeWP widget “Sorting Fields Display” onto the page.

How to Customize Archive Posts Display

  • Archive Post Types

    The Archive Post Display widget in CubeWP allows you to show a list of posts, listings, or custom post types on your archive or search results page.

    To display these posts:

    1. Edit the page with Elementor.

    2. Add the CubeWP widget called “Archive Post Display” from the widget panel.

    3. This widget dynamically fetches and displays posts based on search queries, filters, or archive conditions.

    4. You can customize the layout, design, and post elements (like title, image, meta info) within the widget settings.

    This is essential for showing the actual search or archive results on the front-end in a styled and structured format.